Geospoofing with the Raspberry Pi
Many online services alter their content availability based on your geographic location, which they detect using your IP address. For example, some movie streaming services offer different movies to users outside of the United States, and live sports streaming services enforce regional blackouts to protect TV contracts. These types of practices violate the spirit of the free and open Internet.
The good news is that you can circumvent these unfair practices using a virtual private network (VPN). VPN technology is used heavily in the corporate world to provide secure remote access to a local networks. A side effect of VPN usage is that outbound requests appear to originate from the VPN’s IP address, rather than your own, and you can use this to your advantage to “geospoof” your physical location.
This works great if you’re spoofing on a general-purpose computing device like a laptop. You can just fire up your VPN client and go to town. But what if you want to connect a closed device, like an AppleTV, a game console, or a network-connected TV to a VPN? These devices won’t let you install arbitrary software like a VPN client or let you have too much control over networking.
What you need is a router on your local network that can forward traffic from these devices through a VPN. You could do this by installing open source firmware like TomatoUSB or ddwrt onto a hardware router, but that process can be tedious, and good hardware routers tend to be a bit pricey. I wanted something easy and inexpensive. Enter the Raspberry Pi.

The Raspberry Pi is a credit-card sized, low power computer on a single board that costs about $35. It was originally designed to be a cheap computer for education, but it’s seen a boom in the maker market, too. My friend, Mike, gave me one for Christmas, and it’s been really fun to tinker with.
The Raspberry Pi Foundation releases a special version of Debian Linux called Raspbian which is optimized for the Raspberry Pi. A $35 Linux computer is hard to beat, and it can be turned into a geospoofing VPN gateway on your local network pretty easily. Here’s a step-by-step guide.
Setting up the Raspberry Pi
First you need to start with a fresh install of Raspian. You can download it here and find a guide for writing the image to an SD card here.
The first time you boot the computer, you’ll be taken to the configuration tool, 1
raspi-config
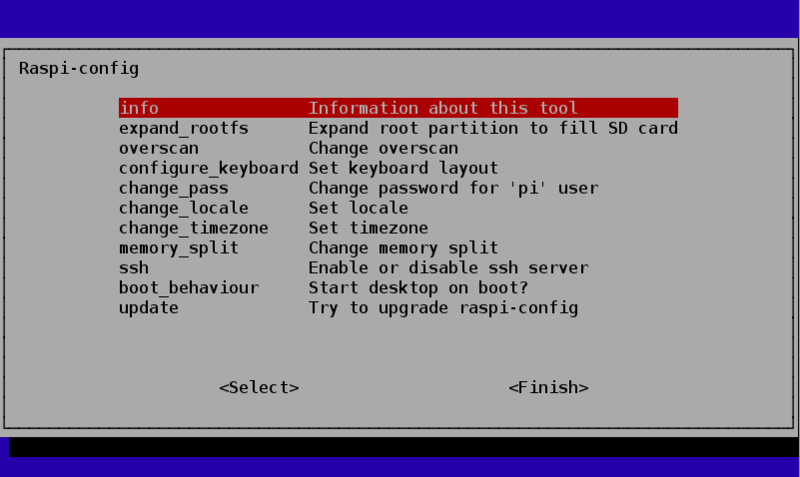
Since you’ll be using this computer as a networking device, you should change the default password for security reasons. Turning on the SSH server is also necessary unless you intend to keep the Pi hooked up to a monitor, keyboard, and mouse.
Next, give your Raspberry Pi a static IP address outside your router’s DHCP range. You’ll use this address as the router or gateway when you configure the other devices on your local network.
It’s a good idea to upgrade all the software on your Pi using the commands:
1
2
sudo apt-get update
sudo apt-get upgrade
The upgrade command will take quite a while to complete, so you might want to kick it off at night before you go to bed or before you go to work in the morning.
Installing and configuring OpenVPN
The next step is to install a VPN client. You can install OpenVPN with the following command:
1
sudo apt-get install openvpn
Now you’ll want to get access to a VPN server in a geographically beneficial area. I’ve had good results with PrivateTunnel. The service is inexpensive, and they have servers in San Jose, Chicago, London, Zurich, and Montreal. Once you choose a server location you can download its related configuration file. Save this file on the Raspberry Pi as 1
/etc/openvpn/server.conf
It’s necessary to make a couple of edits to this file. So open it with 1
nano
1
sudo nano /etc/openvpn/server.conf
Right before the first certificate add the line:
1
redirect-gateway
and further down in the file, change the line:
1
dev tun
to:
1
dev tun0
Configuring iptables
Now that you have VPN software set up, the next step is to turn the Pi into a router. You can do this using the Linux utility, 1
iptables
1
/etc/iptables.test.rules
1
sudo iptables-restore < /etc/iptables.test.rules
Normally you would now test the functionality of your iptables rules. We know that these work, so go ahead and save them into your permanent config file with the command:
1
sudo iptables-save > /etc/iptables.up.rules
You want these rules to be loaded every time the Pi boots, so create a new file:
1
sudo nano /etc/network/if-pre-up.d/iptables
and add these lines to it:
1
2
#!/bin/bash
/sbin/iptables-restore < /etc/iptables.up.rules
Make it executable:
1
sudo chmod +x /etc/network/if-pre-up.d/iptables
Enabling IP forwarding
Finally, we need to enable IP forwarding by editing one more config file. Open up the file:
1
sudo nano /etc/sysctl.conf
and uncomment the line:
1
net.ipv4.ip_forward = 1
Now reboot your Raspberry Pi with the command:
1
sudo reboot
Testing
If everything was done correctly, you should now be able to use the Raspberry Pi as a VPN gateway. On a computer connected to the same local network as the Pi, visit WhatIsMyIPAddress.com. Note your current IP address and physical location on the map.
Now, change your computer’s router to the Raspberry Pi’s IP address. If you don’t know its address, you can find it by running the command:
1
ifconfig
on the Pi. I’m on a Mac and my Pi’s IP address is 10.0.1.202, so my network config looks like this:
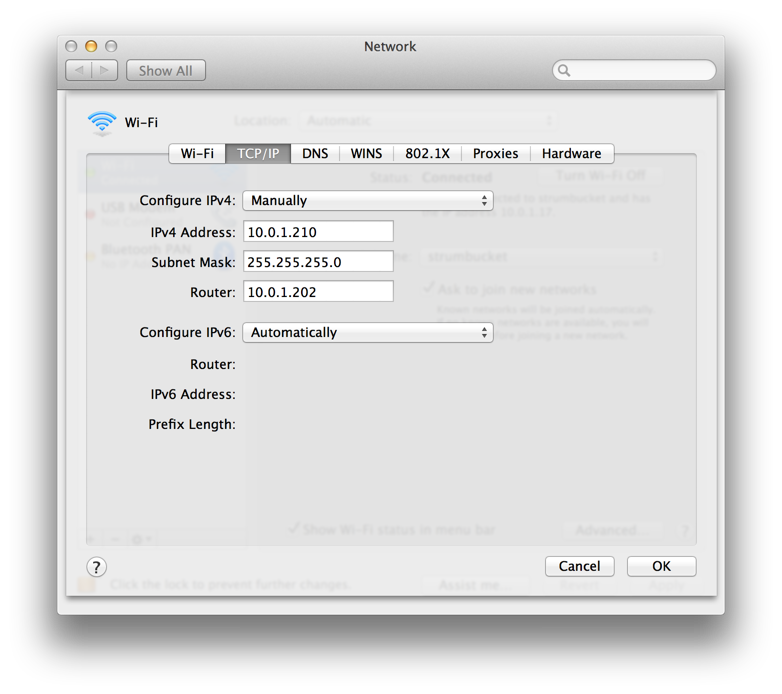
If you’re on Windows I think “Router” is called “Default Gateway”. Now, reload WhatIsMyIPAddress, and you should see the IP address of your VPN and its location reflected on the map. Congratulations! You’re geospoofing!
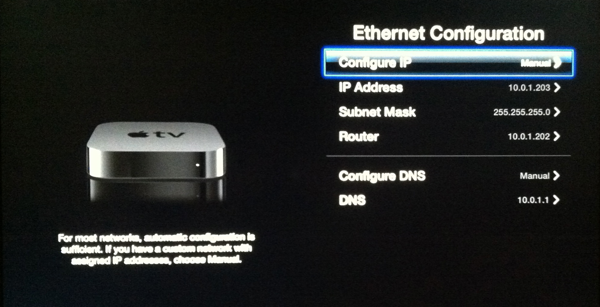
Now all you have to do is set the router (or gateway) on your closed devices like AppleTV and Xbox 360 to the Raspberry Pi’s IP address and you can access content available only in your VPN’s location.
This is what my AppleTV config looked like after setting it to use the Pi as a router:
Using the gateway selectively
PrivateTunnel is reasonably priced, but if you’re streaming video, it’s easy to use up your data transfer allotment very quickly. Luckily, many services use only a single authentication request to determine your location. If you find this to be the case with your service, you can configure OpenVPN to send requests through the VPN only to certain IP addresses.
To do that, open up the config file:
1
sudo nano /etc/openvpn/server.conf
Comment out the line:
1
#redirect-gateway
and right below it add these lines:
1
2
3
4
# Ignore routes given to us by OpenVPN Server:
route-nopull
# Route authentication IP through VPN:
route 184.72.247.194 255.255.255.255
Now restart OpenVPN:
1
sudo /etc/init.d/openvpn restart
In this example, I’ve used the IP address of another IP address checking site, myipaddress.com. If you’ve set everything up correctly, you should be able to reload WhatIsMyIPAddress.com and see your actual IP address, but load myipaddress.com and see the VPN’s IP address. Once you get this working, you can use the route command to send requests to any IP addresses you want through the VPN!
Credits
I learned all the stuff to write this post from:
- RPI as VPN gateway
- iptables - Debian Wiki
- Bugging smart guy Blake Gentry via email