EC2 Micro Instance as a Remote Bittorrent Client
Bittorrent is an efficient, fault-tolerant way to distribute files across the Internet. When a file is popular, it can get shared really quickly as lots of users swarm to download and upload the file simultaneously. When a file is less popular, however, it can take hours or even days to download because of a diminished number of seeders. If you use a desktop computer that runs 24/7 and is always connected to a reliable Internet connection this is no problem, but if your primary machine is a laptop and especially if you use it on the go, slow torrents can turn into a problem.
Wouldn’t it be nice if you had a remote Bittorrent client running on a reliable server somewhere? You could start a download any time from any computer, then pull down the file over a fast, reliable connection when it’s finished. You could even be nice and seed the file for a few days, all the while using (or more importantly NOT using) your laptop as normal.
Amazon’s new, cheap — or in limited cases free — “micro” EC2 instances make this a possibility. Below you’ll find a step-by-step guide to set up your own remote bittorrent client using the Transmission application on an EC2 micro instance running Ubuntu.
Amazon Web Services
First you’ll need to create an Amazon Web Services (AWS) account. If you already have an AWS account you can skip ahead to the server creation. If not head on over to http://aws.amazon.com/free and sign up for an account and get your free Linux-based micro instance (this is what we’ll be using to run our client).
Creating and Booting an Instance
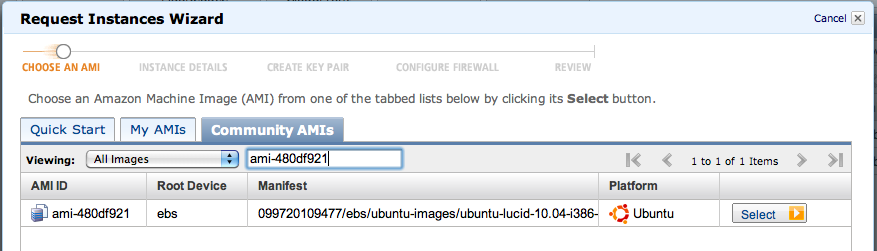
Now that you’re all signed up, we need to create and boot an EC2 micro instance to run our client. EC2 instances are based on Amazon Machine Image (AMI) files. For this guide, we’ll be using one of the official Ubuntu 10.4 LTS AMIs found here. You should chose a 32-bit, EBS-based AMI from a region geographically close to you. I chose ami-480df921.
Once you have the ID of the AMI you want to use, create a new instance based on it. Log into the AWS management console and click on the “Instances” link in the left navbar, then click the “Launch Instance” button.

Click the “Community Instances” tab in the wizard that pops up and paste your AMI ID into the search field. Click the “Select” button next the the search result for your image.
Change the “Instance Type” to “Micro (t1.micro, 613 MB) and click “Continue.”

Click “Continue” on the next screen to use the default Kernel ID and RAM Disk ID.

On the next screen, give your instance a name. I called mine “Remote Bittorrent.” Click “Continue.”

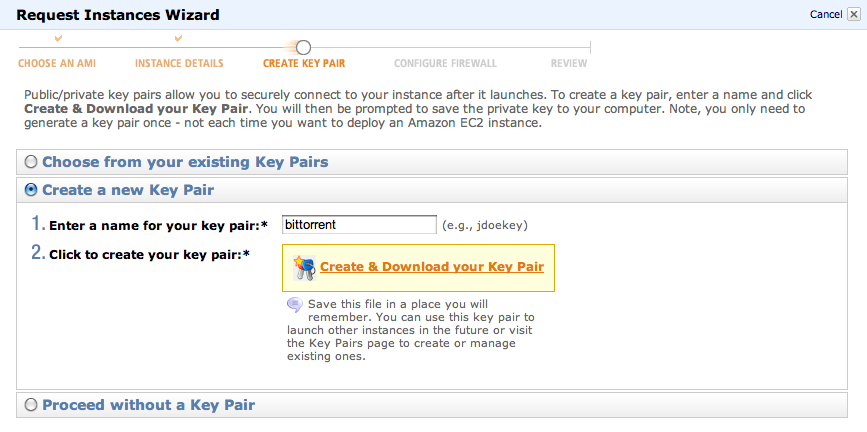
If you don’t already have a key pair set up, click the “Create New Key Pair” radio button and follow the directions to create a new key pair.
On the next screen, click the “Create a New Security Group” radio button. Here we will open port 22 so we can SSH into the server for administration. Add an entry for SSH by choosing it from the select in the “Application” column and clicking the “Add Rule” button. Click “Continue.”

Finally click the “Launch” button to start your instance. It may take a few minutes to launch your instance for the first time.

Return to the management console and click “Security Groups” in the left navbar. Click the name of the security group we just created; we need to a few more rules to it.
First we’ll open port 9091, which is the port used by the Transmission web client. To do this choose “Custom” from the “Connection Method” select box. Chose TCP as the Protocol, From Port and To Port should be 9091, and the source IP should be 0.0.0.0/0. Click the “Add Rule” button. If you don’t see the new rule in the list right away, click the “Refresh” button near the top of the page.
Next we’ll open a range of ports for the actual bittorrent application to use. Again chose “Custom” as the Connection Method, TCP as the Protocol, 49152 as the From Port, 65535 as the To Port, and 0.0.0.0/0 as the Source IP. Click “Add Rule.”

Update/Installation
Now we’ll connect to our new server and configure all of the software we’ll be using. Click “Instances” in the left navbar. Select your instance and select “Connect” under the “Instance Actions” select box. Follow the directions to SSH into your server, but use the user “ubuntu” instead of “root”.

ssh -i bittorrent.pem ubuntu@ec2-184-72-148-12.compute-1.amazonaws.com
Now we’ll upgrade all of the installed packages. Issue the following commands:
1
2
ubuntu@ip-10-203-65-125:~$ sudo aptitude update
ubuntu@ip-10-203-65-125:~$ sudo aptitude upgrade
Next, install the Transmission packages
1
ubuntu@ip-10-203-65-125:~$ sudo aptitude install transmission-cli transmission-daemon
Configuration
Now we want to stop transmission-daemon so we can edit its config.
1
ubuntu@ip-10-203-65-125:~$ sudo /etc/init.d/transmission-daemon stop
Open the settings.json config file with your favorite editor.
1
ubuntu@ip-10-203-65-125:~$ sudo nano /etc/transmission-daemon/settings.json
Save downloaded files in a more convenient place: “download-dir”: “/home/ubuntu/Downloads”
Come up with a password to protect your server: “rpc-password”: “mysecretpassword”. (Don’t worry. This password will be obscured to a hash once we restart the transmission-daemon.) Turn off the rpc-whitelist so we can access this client from any IP: “rpc-whitelist-enabled”: false,
Now start transmission-daemon back up:
1
ubuntu@ip-10-203-65-125:~$ sudo /etc/init.d/transmission-daemon start
Finally, we need to create the /home/ubuntu/Downloads directory and give transmission-daemon the ability to write to it.
1
2
3
ubuntu@ip-10-203-65-125:~$ mkdir /home/ubuntu/Downloads/
ubuntu@ip-10-203-65-125:~$ chown ubuntu:debian-transmission /home/ubuntu/Downloads/
ubuntu@ip-10-203-65-125:~$ sudo chmod g+w /home/ubuntu/Downloads/
And we’re done!
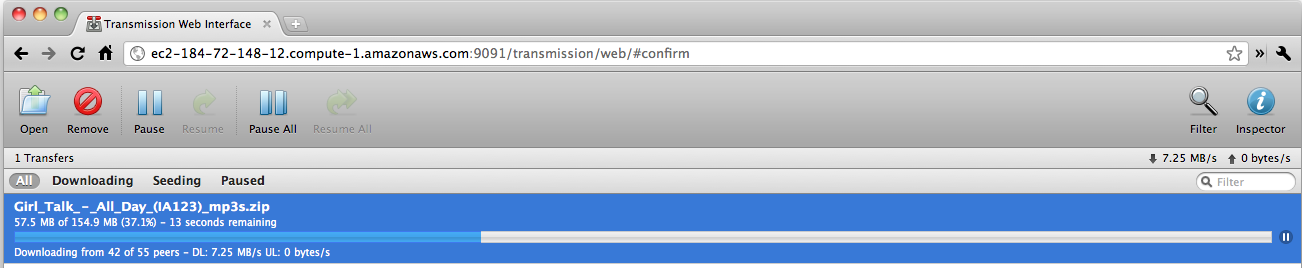
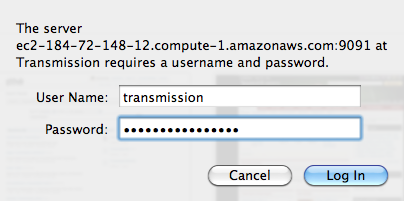
Now point your browser at your instance on port 9091. You can find the URL by clicking on your instance in the AWS management console and checking the value of the “Public DNS” field. For my instance, the URL is http://ec2-184-72-148-12.compute-1.amazonaws.com:9091. You will be prompted to log in. The username is “transmission” (unless you changed it in settings.json) and the password is whatever password you chose in settings.json.
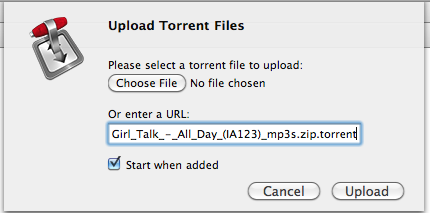
Now you have a client that you can browse to at any time on any computer. You can upload torrent files directly, or you can simply enter the URL of the torrent file and have the client do the rest.
Amazon gets pretty decent download speeds too :)